Updated on November 26, 2025 by Angelika Klein
I plan all my travel routes with Google My Maps.. This is a feature of Google Maps that you may not know about yet. You can use it to show your create and customize your own maps. The function is suitable for planning routes with multiple destinations as well as for City Trips, for example for a city tour.
You can use in your map sights, restaurants, hotels etc.in your map, and you can also add photos and comments. In this way, you can create a comprehensive personal map, customized to your wishes. You also have the possibility to share your maps with your travel partners. This is the ideal tool to plan your road trip in Germany - don't you think so?
So if you have already decided on a destination and possible stage destinations, you can start planning your route right away. If you're not yet sure where you want to go, read my article first How to Plan Your Road Trip: 3 Steps to the Perfect Tour. In it, I show you step by step how to plan your ideal road trip.
Plan Your Google Maps Route with Multiple Stops (10 Steps to Create Your Own Map)
Unfortunately, there is no app for Google My Maps. You can only create My Maps maps in the browser. The most convenient way to do this is on your desktop. When you are done with your travel planning, you can find the map in the Google Maps app and download it for offline use. I'll show you how to do all that in this post.
- To create your own map, you need to log in to your Google My Maps with your Google account.
(First sign up for Google if you don't have a Google account yet. This is very quick).
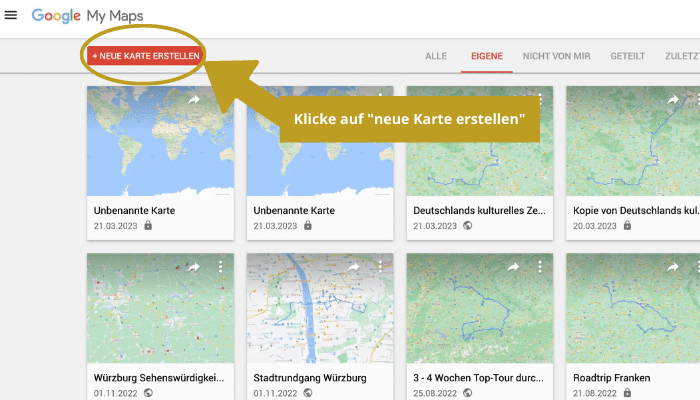
- On the My Maps start page, click the red button in the upper left corner. "Create a new map" (alternatively, you can also open this item in the hamburger menu in the upper left corner).
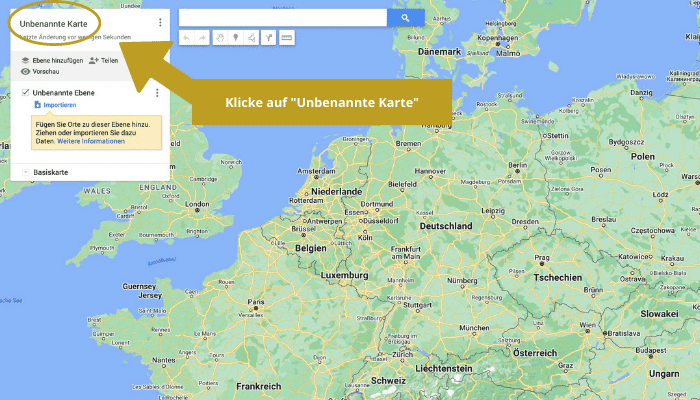
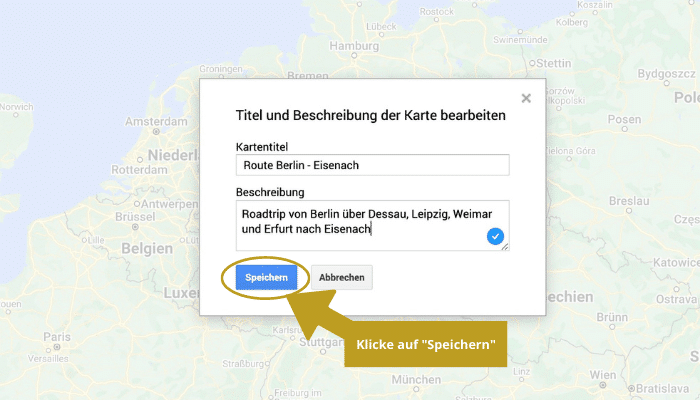
- Click in the menu on the left side of the screen on "Untitled Map". A window will open where you can add a name to your map - for example "Roadtrip Germany" - and a description.
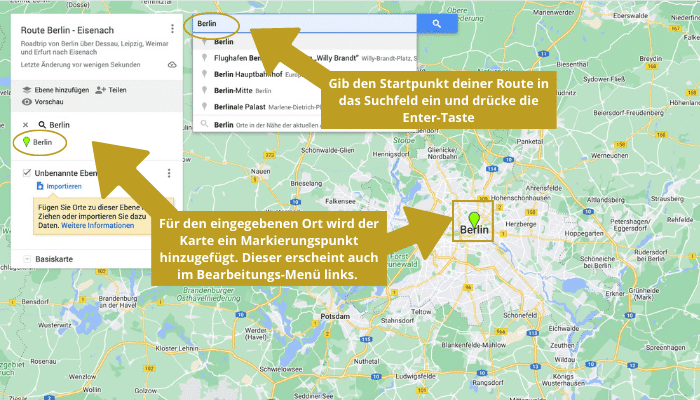
- Type the starting point of your road trip into the search field enter. You can also enter the exact address or the name of a hotel, etc. Press Enter. The place is marked on the map with a colored pin.
- Click Add Routes to create an edit layer for the itinerary. By default, the layer is called "Unnamed layer". Give it a descriptive name, for example, "Road Trip from Berlin to Frankfurt. This will help you find your map in your collection later.
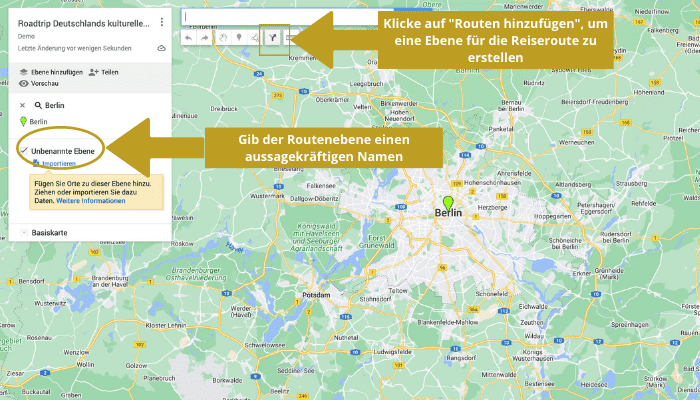
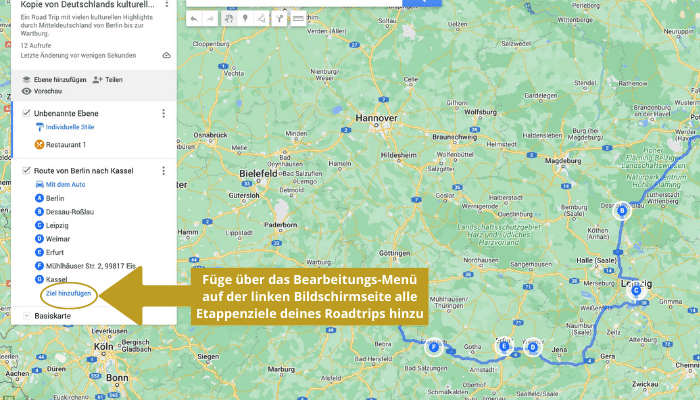
- Use the edit menu on the left side of the screen to add all the destinations of your road trip to the map. You can add a maximum of 10 stops. If your trip contains more than 10 stops, you must add an additional layer to the map. I'll explain how to do that in the next step.
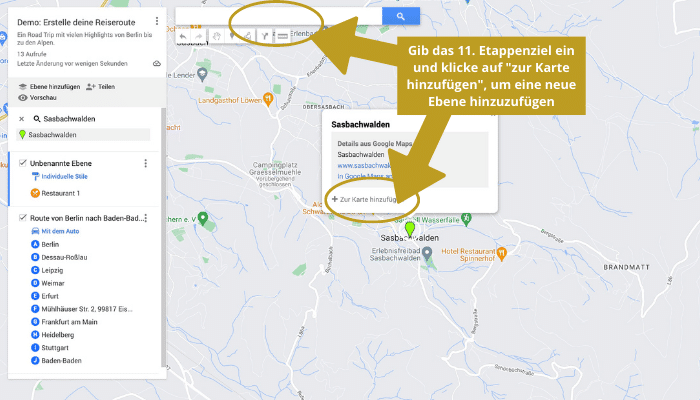
- For more than 10 stops, proceed as follows: Enter the 11th stop in the search window. Then click on "add to map" in the description window of the 11th destination of the itinerary (here: Sasbachwalden). Then click on the marker of the new location.
- The description window for the location opens. In the description window of the location click on the icon "add directions"to connect the two layers.
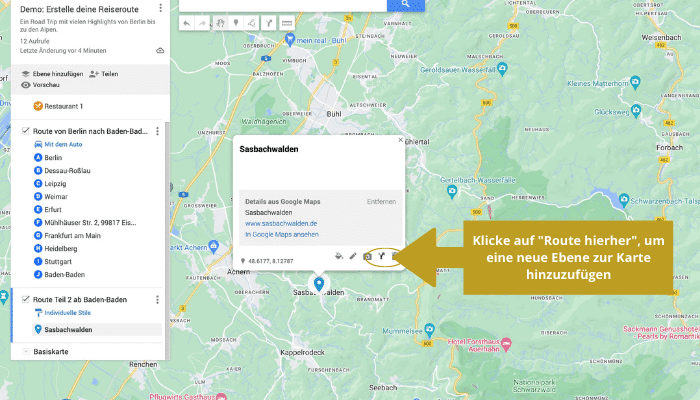
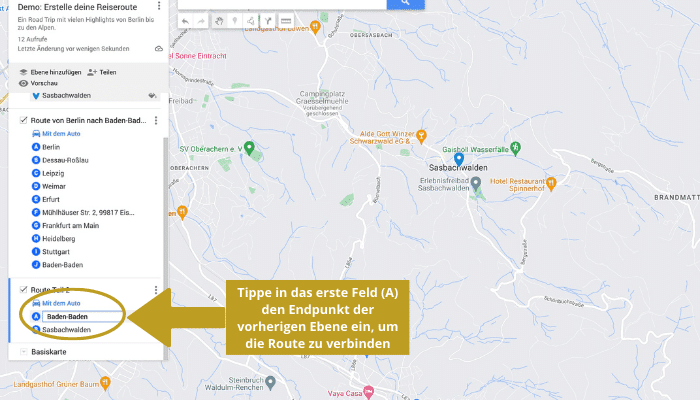
- Enter in A as starting point for the new level the last destination of the previous level (in my example this is Baden-Baden) to join both levels to one route.
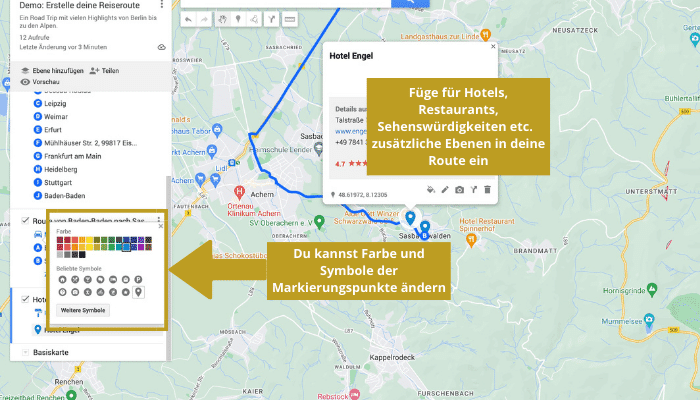
- You can add additional layers for hotels, restaurants, sights etc. and choose different icons and colors. This way you can create your very own map.
View your custom maps in the Google Maps app and download them to your phone.
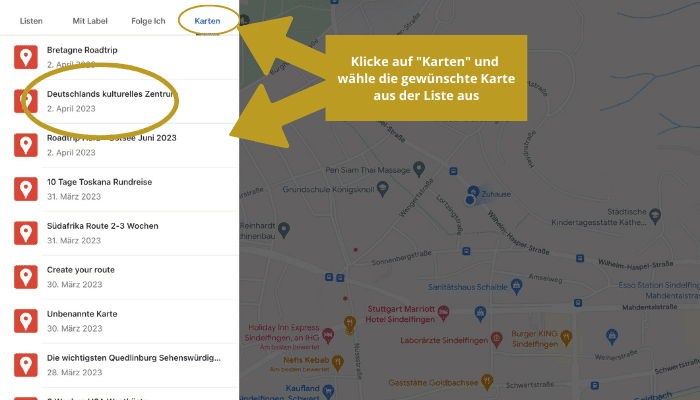
- You can access your self-created maps via your cell phone in the Google Maps app: To do so, click in the Google Maps App on the „For you“ icon.
- Scroll down to the „Maps“ icon and click on it. There you will see a list of all the maps you have created and the maps of others, if you have saved them (you can find out how to do this below).
- Select the desired map. It will be displayed to you in Google Maps .
You Only Want to Visit one City and Don't Plan to Do a Longer Road Trip?
With Google My Maps, you can also plan your individual city walk for your next city trip. See how I did this for Würzburg .
3 Extra Tips for Your Route Planning
1. Save All Highlights in Your Map
Have you ever realized after a trip that you missed a great hike, an interesting museum or an important monument? If you prepare your trip well and mark all the highlights on your map in advance, you significantly increase your chances of not missing anything important.
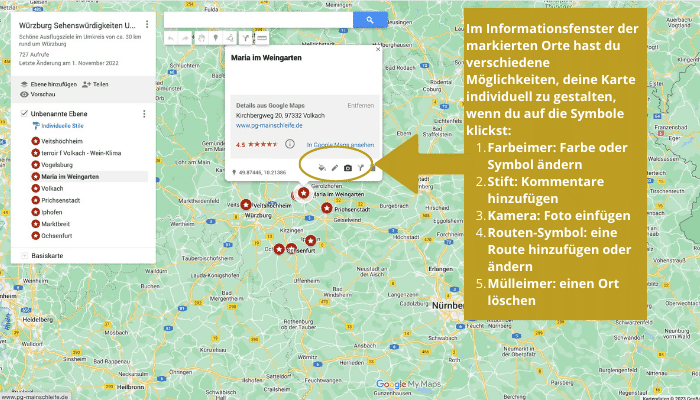
In the information window of a marked location you have the following design options:
- Click the color can to change colors and icons of the markers.
- Click on the pencil to add a comment or description to the location.
- Click on the camera to insert a photo.
- Click on the route icon ("add directions") to add a route to another location on your map (I'll explain in the next paragraph how to change the routing).
- Click on the trash can to remove the location from your map.
2. Choose the Most Beautiful Route and Mark it on Your Map
GPS or Google Maps usually guide you on the direct way to your destination. But on a road trip, sometimes you don't just want to get from A to B, you want to take the most scenic route. In Google My Maps, you can mark your favorite route and make sure you don't rush through the most beautiful areas on the highway.
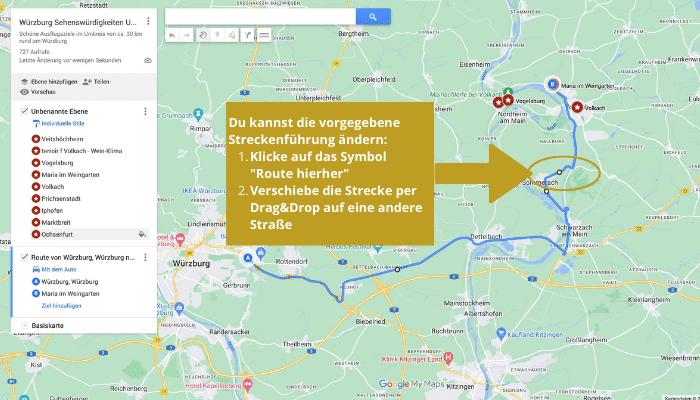
3. Save maps from travel bloggers to your phone
Maybe you've found a route you like on my blog or another travel blog and don't want to make up your own road trip. Most bloggers use the My Maps application for their route suggestions, so you can easily download their routes to your phone. Often, travel bloggers put a lot of work their road trip suggestions to help you plan your trip. It would be a shame if you didn't take advantage of that. You don't always have to reinvent the wheel!
And this is how it works:
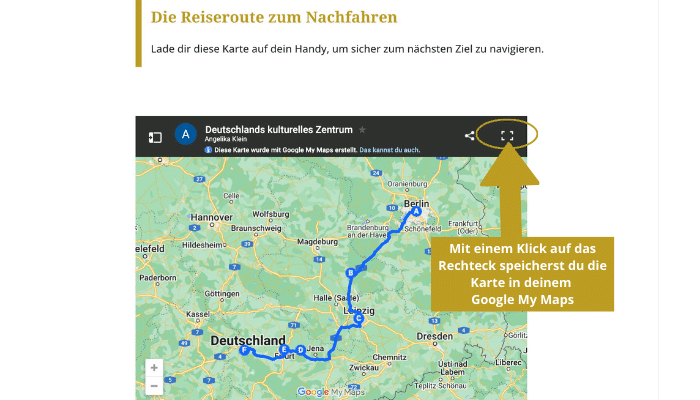
In your selected map, tap on the rectangle at the top right of the map. This means that this card is already saved in your own cards! I have explained how you can find it on your cell phone. further up described.
Conclusion: Use the Full Potential of Google Maps by Planning Your Route with My Maps
Google My Maps is a free application from Google that lets you create and share custom maps. The capabilities of My Maps go far beyond those of Google Maps. You can use it to:
- share your maps with others and embed them in your website
- create and edit custom symbols and lines
- create and edit multiple layers (e.g. separate layers for sights, hotels, restaurants, etc., as well as separate layers for partial routes)
- add and edit custom routes
- add and edit custom locations
- choose different forms of mobility (by car, by bike or on foot)
- download your My Maps maps and use them in Google Maps under My Places > Maps.
Have fun planning your next road trip or a fascinating city break!



Thanks so much for this great info. How do you get Google to use a scenic route vs the fastest route. We are going from Frankfurt to Heidelberg to Rothenberg to Nuremberg to Salzburg to Innsbruck to Mittenwald to Lucerne to Grindelwald to Zurich on a driving road trip. I'd like scenic routes/ good stops. Do you have any advice?
Dear Karen,
What a great tour you have planned! If you want to use Google Maps, there is an option "avoid highways" in the menu behind the 3 dots next to the fields where you enter your start and end point. The routes you get will definitely be more scenic than the highway routes. However, if you want to make sure to see certain points of interest it needs a bit more preparation work. In this case I suggest you use Google My Maps and prepare the route including the highlights you don't want to miss. This is the use case for which I have prepared my step-by-step guide 😃. If you follow the steps explained, you should be able to prepare your personalized scenic route. The following blog posts might also be helpful for your tour preparation: https://angiestravelroutes.com/en/road-trip-germany/, https://angiestravelroutes.com/en/most-beautiful-german-cities/, https://angiestravelroutes.com/en/most-beautiful-regions-germany/ https://angiestravelroutes.com/en/unesco-world-heritage-sites-germany/. If you require further assistance, please feel free to contact me by email at . Have a wonderful trip through Germany and Switzerland!
Cheers!
Angelika
Angie, I am a travel pro like yourself, and now planning another trip to Germany. Your website has been incredibly useful to me! I have led 80 tours through Europe by train, and am a travel filmmaker with 1400 videos and 146,000 subs on YouTube. You have reminded me about the beauties of southern Germany, and many other things. I am so glad you are using GoogleMyMaps, which I have also been creating for a long time. Your excellent description 0f how-to is very good, but there are some advance tips I would like to share with you, such as using csv to bulk-load information on the map. You can see my website here: https://townsofeurope.com/ Please send me an email so we can have a good exchange of information!
Thank you for your nice comment, Dennis. I just saw your impressive YouTube channel and website. Good to hear you found the information on my blog useful. You are so right - there are lots of beautiful places to be discovered in Germany - please let me know if I can further assist you with the preparation of your trip (). I know about the option of using CSV on Google MyMaps, but in my how-to guide I wanted to share the basics with travelers who don't necessarily have much technical knowledge. Thanks again for your feedback which I appreciate very much!